Crate GC-412TR Speaker Cabinet Refurbishment

One of my repeat customers cruises the pawn shops and from time to time picks up interesting-looking items.

He called me to tell me that he had gone shopping again and to bring the truck this time!.  He had another project for the Unbroken String Crew to refurbish!

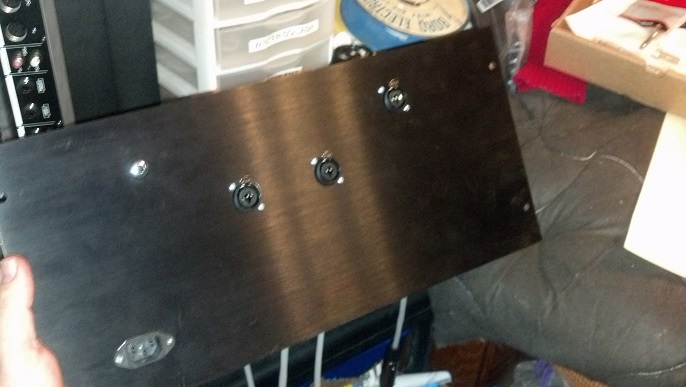
This unit had sustained some damage to the input jacks, perhaps from falling over. Only one of the jacks would accept a quarter-inch plug.

The original wiring scheme allowed for this cabinet to be daisy-chained with another loudspeaker cabinet. My customer had something else in mind, to make this into a stereo cabinet. Off we go!

I am unsoldering these two jacks to separate them and make them independent.  One of the jacks had been deformed, so the sleeve was refurbished using a reamer to lightly remove a lip over the hole.

Now the jacks are reinstalled, but rotated so that the internal contacts don’t touch each other.

The original loudspeakers were dry-rotted, and two of the voice coils dragged on the magnets. Time for an upgrade!

“FST” stands for Formosa Speaker Technology in, as you might not expect, Mainland China.  They have a one-inch voice coil.  These were probably OK when not driven too hard when they were new, but they have deteriorated over the years.

These little jumpers connected everything together. I would guess these are about 22AWG wire gauge. I will go back in with red and black 16AWG that I have on-hand. A bit of overkill, but there will be no question about the wire getting in the way of voice coil current when using the larger wire.

My customer asked for a stereo cabinet, with the loudspeakers in each channel wired on the diagonal as shown here. I can use the old loudspeakers as a mock-up to build the new wiring harness.

With all the loudspeakers in place, this will be the approximate wiring setup.  My customer has a stereo guitar amplifier with which to drive this cabinet.  The loudspeakers in the guitar amp were sixteen ohm units in each channel.  To limit the load on each amp channel, this cabinet will be wired so that these loudspeakers are in series and the total load of each channel will be 16 ohms.  When this cabinet was plugged into his stereo guitar amplifier, the amp will then see an eight ohm load per channel.

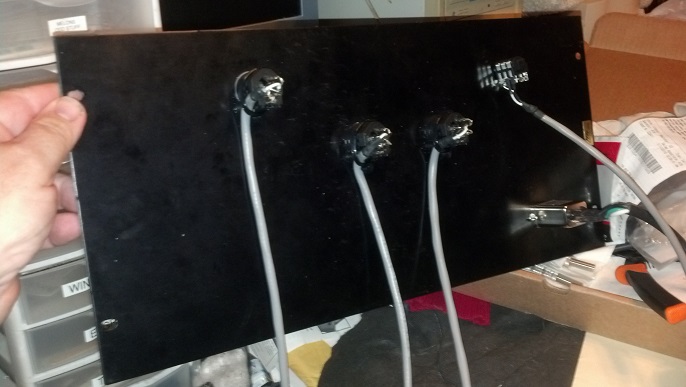
This clip lead allows a pair of wires to be snaked around inside the enclosure.

Four of these guys arrived from eBay. They were pulls from another project in favor of Greenbacks, but these loudspeakers will be just fine for what we’re doing.

I pulled the new 16AWG wiring into the cabinet and began installing loudspeakers.

A quick check of polarity and phasing reveals that all is OK with the assembly. Time for all the screws to go in!

A straight application of Pledge furniture polish and a toothbrush is cutting years of crud out of the Tolex. A little furniture polish will leave the cabinet “Lemon Clean”, as the ad says…

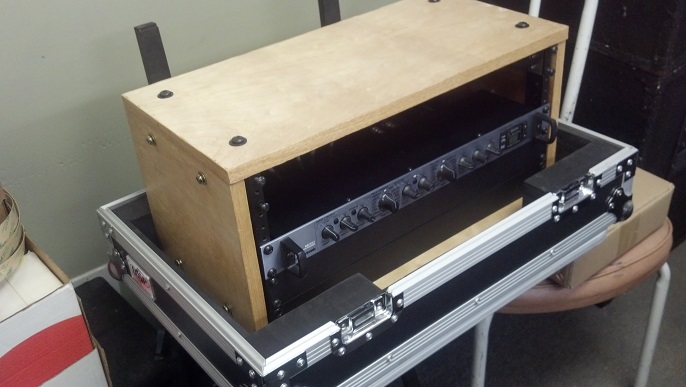
The last picture should show the completed system, but I think this picture, taken before the original grille is reinstalled, is better!

Thanks for reading all the way to the end of this post!

CONTACT INFORMATION : David Latchaw EE

281-636-8626

Vintage Electro-Harmonix Memory Man Pedal Refurb

A good friend of UnbrokenString wanted this unit checked out. After some years of dis-use, it was time for this pedal to get ‘back into the loop’ as it were…

One never sees this style of construction anymore.  The sheet metal box has given way in favor of the die-cast boxes used today.  An attached AC cord is almost never seen on pedals, but the DC power adapter, or 9v battery, has taken its place.  This is a piece of history!

These are the in/out jacks and an AC power switch.

No set screws here, but rather the D-shaped holes in the knobs are lined with metal to toughen them up.

This foot switch needs a little attention. The nut is a thin locking ring, and absorbs the entire pressure of the foot when the switch is ‘stomped.’

The printed circuit board is single-sided, with jumper wires installed as-needed to complete the circuity.

The CMOS logic and the delay line are socketed.

The ubiquitous 1458 dual operational amplifier makes an appearance in this circuit.

Let’s straighten out that stomp switch. In this picture, I’ve used some hard plastic sheets to protect the face of the pedal from the sharp edges found on the jaws of my pliers. Those sharp edges are necessary to get a good grip on the jammed knurled nut.

This is when I’m glad I have that hard plastic in place, or I’d really be making a mess of things.  The knurled nut is coming off for the last time.  It’s headed into the recycle bin as the threads are ruined.

For cleanup duties, I really like the Gibson guitar polish. No matter how delicate the finish, the polish seems to clean and condition any surface without leaving a detectable residue behind. It makes sense that something made for guitars that cost more than my car would be good stuff.

A larger nut and washer spread out the pressure applied on the stomp switch.

If you ever get a chance to fool around with one of these, you will delight in the cool sounds and effects of which it is capable. I was honored to be able to recondition this unit and spend some quality time with it cabled between my guitar and amp. Highly recommended!!

Thanks for reading all the way to the bottom!

CONTACT – David Latchaw EE
281-636-8626

K and K Sound Preamp in a Road Case

The owner’s classical guitar was instrumented with a piezo pickup at the saddle and a condenser microphone inside the sound hole of her classical guitar. Both signals are sent out of the guitar on a TRS cable to this two-channel preamp.

The Unbroken String Crew was asked if we could house this in a box of some sort that could be transported from studio to live venue in a road case.  A rack case was way too big.  Could we help?  The Unbroken String Crew says YES!

02 effects proc

Along for the ride is this processor which provides reverb for one of the channels coming from the preamp.

03 spanner screw

To fasten the preamp to a rack shelf, these little spanner screws will need to be removed and reinstalled. No problem, with the right tool.  Perhaps K&K wished to keep prying eyes out, but this will not hinder the Unbroken String Crew!

04 inside view 1

WARNING – Tech Porn.  The inside of the preamp is clean, a single-sided circuit board with only a few insulated jumpers on the bottom.  No surface mount parts here.  The strong point of this package is that the entire thing is surrounded with iron, just the thing to keep interference out of the high-gain, low-level circuitry found here.

05 inside view 2

WARNING – More Tech Porn. The 4558 is a workhorse amplifier, often found in high fidelity circuits.

06 inside view 3

WARNING – Yet More Tech Porn. The TL074 is another mature, well-behaved amplifier.

07 rack shelf

This rack shelf was cut down and re-purposed for service as a method to facilitate mounting the preamp on a 1U space without treating it as a traditional half-space unit. The preamp will look better centered in the rack space.

08 trial fit

The trial fit looks pretty good!

09 no feet

The rubber mounting feet on the bottom of the preamp need to come off.  They are press-and-stick, so we can peel-and-discard them.

10 ground bolt

The ground stud in the middle of the circuit board goes all the way through the bottom of the case.  We can use this as one of the mounting points, securing the preamp to the shelf.

11 preamp ready

Everything is bolted down, including the two side ‘wings’ that keep fingers out of the electronics.

12 start stack

This is a mock-up of the units that will be fitted into the rack rails.

13 rails and fillers

This is the operator’s view of the front of the unit.  Everything, including some blank panels, are bolted to the 5U rack rails

14 bracket prep

The corners of the unit will be fabricated from this two inch aluminum channel.  Here, we’re tapping a hole for 1/4-20 hardware that will be used throughout.

15 rail assembly

The front and back rack rails on one side of the unit are screwed to the aluminum corners.

16 guts

Both end assemblies are bolted to the equipment.  Can you visualize how this comes together?

17 wood ends

Each end is covered with Baltic birch plywood.  These furniture screws bolt the plywood cover to the end assemblies.

18 with top

We’ve installed the top onto the end assemblies.  A 1U rack space was left above the preamp because the nomenclature for the control knobs is printed on the top of the preamp, which would be obscured by the top if the preamp was installed in the top slot or if a blank filler panel were installed above the preamp.  There is also a LINE/MIC control for one channel that is only accessible from the back, but the customer would almost never need that feature.

19 panel fab1

The back panel is fabricated from a 5U blank panel.  Holes for the electrical connectors and the power outlet are bored.

20 panel fab2

The mounting hardware screw holes are placed as required.

21 panel fab 3

Here you can see the IEC power socket.  The line-level outputs are XLR/TRS bulkhead connectors from Neutrik.

22 panel fab 4

Shielded twisted pair wire is attached to the back of the connectors and are strain-relieved.  The TRS input jack that accepts the cable from the guitar is located on the far right of this picture.

23 first test

Now we did a test run to verify functionality and then off to the studio for our first real music!  Powered speakers are the load.  There is a guitar here somewhere, but it is not in the picture…  email me if you find it.

24 straight edges

Now that we know this all works, it’s time to finish the raw edges.  We’ll sand them straight to remove the saw marks.  This emery paper-covered Stanley level is also used to level fret wires.

25 edge finish

Self-adhesive oak edging is used to cover the exposed edges of the birch plywood.

26 trim

The edging is trimmed flush with the plywood with a sharp Exact-o knife.

27 sealer drying

The wood parts are saturated with MinWax Wood Hardener, which is just a shellac wash.  Coat after coat is applied until the wood is saturated and sealed.

28 base fit

This bottom is fabricated to fit into the road case.  The road case is an off-the-shelf case for a Mesa Boogie Quad Rectifier amplifier head.

29 base

This is a good fit into the foam, but it is not tight.  The unit can be removed from the base of the road case as needed.

30 Final Assy

The partially-disassembled unit is lined up on the base and the holes are marked for the furniture screws that fasted the unit down to the base.

31 power cord

The power cord can be left in place during transport if I carve away this little bit of foam.  There is plenty of space left in the road case for cords and cables to be stored with the top of the case in place.

32 All Done

This is the assembled case.  The preamp will now be installed, the top of the road case latched down, and this guy is ready to travel the world!  We may come back later to paint the wood black, because the new owner complained that this unit distracted peoples’ attention from the musicians!  We can’t have that!

You can hear this box at work (and listen to an awesome ensemble as well) here: http://www.paranamusic.com/


Thanks for reading all the way to the bottom!

CONTACT – David Latchaw EE
281-636-8626

Taming Your Sheet Music

From time to time, my students has problems with single sheets of musical staff paper blowing off their music stands.  So, the Unbroken String Crew came up with this solution:

SheetMusic1

We grabbed a manila folder and placed the sheet music on the folder.

SheetMusic3

Note that the sheets are almost as large as the manila folders.

SheetMusic2So, with a pair of scissors, we trimmed off the margin around the music staff.

SheetMusic4Now that the margins are trimmed, we have some space for some invisible tape.

SheetMusic5We position the sheets so that the edges are well away from the edge of the manila folder.  Can you see the invisible tape?  I can’t either.

SheetMusic6Sheet music that covers only two pages can be taped inside the manila folder.  For scores that exceed two pages, another manila folder is cut apart to make an inside page ‘carrier.’

SheetMusic7Here, both sides of the cut-down manila folder inner page are used to hold sheet music.

SheetMusic8

And would you believe, the whole thing can be folded shut and stored in a file cabinet?  And the title and composer info can go on the tab?  Who would have thought?

Sometimes the simple solution is the best solution.  As we sometimes play outside, or in front of fans, single sheets of paper are Bad News.  This little trick weighs down each sheet and keeps it flat.

Thanks for reading all the way to the bottom!

CONTACT: David Latchaw EE

281-636-8626

University Sound Speaker Columns

I picked up a pair of these loudspeakers on eBay a few years ago.  I was intrigued by the line array concept, plus these were architectural loudspeakers that could be used out-of-doors if kept out of direct rainfall.  Just the thing for the sound at outdoor shows for my dancing group, The Rhythm Cloggers of Houston, Texas!  However, the foam behind the metal grille was shot.  New foam was ordered.  With the company Christmas party coming up, it was high time to get these loudspeaker cabinets squared away!

The grilles are held on at each end with these U-shaped aluminum corners.  Off they come.

Each end of each loudspeaker is identical.

Yuck!  The old foam had oxidized and crumbled away to nothing.  This won’t keep the rain out!

This is something that should NOT be done on the carpet.  I took these out to the shop because the concrete floor is easier to clean.

Removing the old foam from the grille is trivial.  However, a respirator is needed unless you want to cough for a month.

What attracted me to these line arrays is that the loudspeakers themselves are tilted in the same manner as a Fresnel lens focuses light, although the lens itself is physically flat.  The idea is to ‘focus’ sound in a horizontal plane, rather than let it spread up and down in a spherical manner in accordance with the inverse square law.

In a mobile DJ setup, I wanted to use Neutrik Speak-On connectors.  These screw terminals are fine for fixed, architectural applications, but were not what I wanted to gig with.

The internal wires are retained, and the old terminals are just snipped off.

New plates are fashioned from standard electrical junction box plates.  The hole for the Neutrik Speak-On is already drilled.

Here is a close-up of the new connector.  It’s really hard to confuse one of these with a quarter inch phone jack, which is a real positive when setting up in a hurry under less-than-ideal conditions.

The backsides of the grilles were sprayed with clear automotive headliner adhesive, then the new foam was smoothed into place.  The new foam was cut over-sized from a roll, so there was plenty of leftovers that required trimming.

A sharp Exacto knife works well to trim the foam.  This is the same foam I used in an earlier post to replace the wind screen in a Shure microphone.  This stuff is handy to have around!

While I had the units apart, I checked the wiring to learn a little bit more about how this line array works.

Here’s the new audio jack installed in the electrical junction box cover, now painted black.

The old wiring is now soldered to the jack from the back.  “Steel City” for heavy metal music, maybe?

A little heat shrink tubing adds physical support to the solder joint, as well as adding some electrical insulation.

The edges of the grilles are supported by some aluminum channel.  When we reinstall the U-shaped aluminum ends, we’re done here. Let’s try it out!

The University Sound Speaker Columns are hard at work behind the scenes at the Spectrum Scoreboards Christmas Party.  These ran all afternoon, driven by a one hundred watt powered mixer that you can see to the right of the fire extinguisher.

Thanks for reading all the way to the bottom!

Contact: David Latchaw EE
281-636-8626