Crate Vintage Club 30 Recap

Robin had another of these wonderful Crate combo amps for servicing.  The Unbrokenstring Crew knew just what to do!

Robin’s 50 watt combo was serviced earlier, in this blog post: https://www.unbrokenstring.com/crate-vintage-club-50-amp-repair/


This is a 30 watt unit, with very similar construction.  Look at all that St. Louis Music goodness!


The loudspeaker is 100% and made in U.S.A.


This pic just documents where the wires go.


These wires go to the reverb tank.  They are marked with a magic marker so that they can be correctly re-installed.


The tubes need to come out as we are removing the printed circuit board from the chassis.


These numbers correspond to the tube numbers on the schematic.


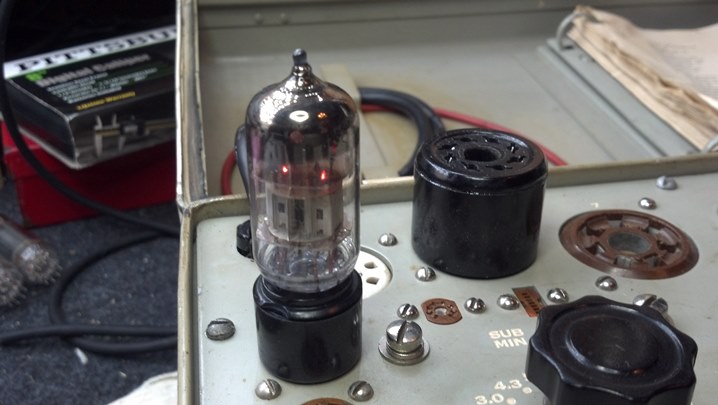
While we’re here, we’ll make a check of the condition of each of the tubes.


Restoring the washer stack is essential to keep the strains on the printed circuit board to a minimum when reassembled.


So we are now able to remove the main circuit board.


As we did with the 50 watt unit, we are taking this opportunity to clean up the front panel.


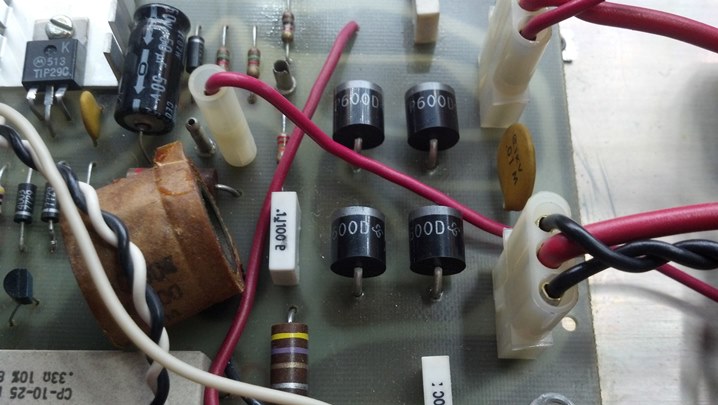
Sure enough, the capacitors have reached End Of Life.


This circuit board is now recapped!  Pretty!


After reassembly, this quick check shows us that we can drive 30 watts continuously into eight ohms with no problem!


This unit has an easy bias setting arrangement.  Here, we’re using the 4 1/2 digit Fluke meter to measure current.  The AC power is supplied by the Variac on the shelf.


Some of the cabinet screws were cross-threaded at one time in the past.  So, we can chase them with a die.


The captive nuts are cleaned up with a matching tap.  We’re good for Final Assembly!


Another fine combo amp is ready for the next million miles!

Thanks for reading all the way to the end!

CONTACT – David Latchaw EE
281-636-8626

Peavey 260 Booster Amp Needs a Boost

A local church has a rack of Peavey gear that drives their public address system.  This unit had failed.  A phone call to The Unbrokenstring Crew was all that was needed to get this unit onto the operating table.
Unlike a traditional guitar amp or stand-alone amplifier, this unit takes high level signals and buffers it to the loudspeakers.  They are often used as a means to fill in or expand the coverage of an existing system.


And the inputs are daisy-chain-able.

This is, of course, the volume knob.


Here is a tour of the rear panel.  The power switch is ‘center-off’ and, on this unit, does not switch the chassis ground to connect to one side or the other of the AC power line.


No tour of a rear panel is complete without a high-rez pic of the power cord.


And the name/rank/serial number part of our tour.


The AC line fuse was popped.


This is, correctly, a five amp slow blow unit.


Removing the front and rear panels permit access to all the electronics.


The chassis is attached to the rear panel of the unit.  Surprisingly, the power transformer is NOT fastened to the wooden cabinet, but is also attached to the rear panel.


These filter capacitors are good and will not be replaced.


This unit has a shorted rectifier.  New parts were secured, and are shown here.  Although only one rectifier is bad, the other three are the same age and have experienced the same abuse, so they will all be replaced.


The new rectifiers are installed.


Funny thing is, the new fuse looks a whole lot like the old fuse, except it is not all exploded and burned and stuff.


The output from my radio is amplified to a larger signal using my Marshall Stack, to drive the input of the amp at the proper level.


This was the point when the neighbors called the cops to complain of the noise.

Thanks for reading all the way to the end!

CONTACT – David Latchaw EE
281-636-8626

Jasmine Classical Guitar Needs a Setup

Sophia’s classical guitar had developed a buzzing string.  Perhaps the humidity changes had changed the geometry of the instrument.  She immediately called The Unbrokenstring Crew to take a look at it!
This instrument has a truss rod, something a little out of the ordinary for classical guitars.


This is an Indonesian instrument, with lots of mahogany throughout.


Using the truss rod adjustment, we make the fret board as flat as we can get it.


My Super Duper Absolutely Flat sanding bar goes to work on some high frets.


Can you see where the metal has been removed?  This is near the tenth and eleventh frets.


One side of the fifth fret was particularly high.  This was the source of the original buzz.


The wreckage was bad over the body of the guitar, where the fret board was probably glued straight to the sound board.


Before we crown the frets, the fret board will be taped off.


To clean and condition the fret board, Dr. Duck’s Axe Wax goes to work.


These strings are going back on the instrument.


The strings are nicely tied off at the block here.


The stringing process is documented in earlier blog posts.  Everything is going well here!


Sophia performs live while standing.  So, we’ll add a strap button to the instrument lower bout here.


The hole for the pin clears the body of the screw.


This strap pin is just above the center line of the instrument. so that it will hang flat against her body.


This strap pin is from an inexpensive electric guitar that had strap locks installed.  It goes nicely with the binding.


At her favorite venue, Dunn Brothers Coffee in Friendswood TX, Sophia tunes up with an app on her phone.  Life Is Good!

Thanks for reading all the way to the end!

CONTACT – David Latchaw EE
281-636-8626

Mesa Boogie Bass 400 Repair and Refurbishment

Craig was very proud of his rack-mount tube-powered bass amp.  But there were crackles and pops while playing.  He wanted to have everything looked-at.  Could The Unbrokenstring Crew get it tuned up?
This is a heavy monster.  Yes, that implies 400 watts out.


These are the tubes that were still alive.  We’re missing a couple of pairs.


Some contact cleaner/lubricant will be applied with a pipe cleaner into each socket pin.


The sockets are in good shape, but just need some chemical attention.  You can still get pipe cleaners, but instead of checking the tobacco aisle, you might look at the gun cleaning supplies section of WalMart to find them.


The individual pins on each tube are wiped with the contact cleaner/lube before they are inserted into the unit for testing.


The push pull class AB1 pairs are oriented from front to back in the chassis.  Once the operating point was established, pairs of tubes were sorted that had similar characteristics.  So we matched six pairs of tubes to within 2% of each other.  Power and output transformers are seen in the foreground.


The amp was driven by a sine wave and operated at 60 watts into a dummy load.  Each pair of tubes were verified in sequence.


And this is what six pairs look like while putting 400 watts into a dummy load on a messy workbench.


Craig gigged with this amp.  When someone asked what he thought of his rig, he said, “It’s brutal.”

Thanks for reading all the way to the end!

CONTACT – David Latchaw EE
281-636-8626

Epiphone Dot Gets a Customized Bigsby Tremolo

Matt with My Twilight Pilot lusted for a black Epiphone Dot with a Bigsby tremolo assembly. Could the Unbrokenstring Crew rise to the occasion and make it happen?
It don’t get mo’ prettier than this!


The Bigsby needs a small modification, so that the tremolo bar can swing over the strings.  Here, the Bigsby is disassembled so that the modification work can begin.


This piece limits the swing of the arm.  So, we will carve on this to change the limits.  We don’t like limits.


After the carving, the metal is sanded to a uniform satin.


Successively finer grits remove the scratches from the previous operation.


This metal polish is made in Germany.  The Unbrokenstring Crew uses this stuff to polish fret wires.  Likewise, it will polish this Bigsby so that it gleams.


We’re just about there with the modification.  It can stand a little more carving.


The tailpiece is centered on the centerline of the strings, not necessarily the center seam of the lower bout.


When the body of the Bigsby is correctly positioned, there are two places where the metal touches the finish of the guitar.  While we are adjusting everything, some painters tape protects the finish.


We are committed at this point.


Two strings are installed to tension the Bigsby into position.  The location of the two additional screw holes are determined so that the whole assembly is straight with the neck before the holes are drilled.


This drill bit is in a spring loaded shell, which forces the actual bit to be in the exact center of the hole.


The strings are ON and now we can proceed with the setup of the Bigsby. See the small nylon washer where the spring fits?  This is an essential part of the setup.


String tension lowers the height of the tremolo bar.  We need to be in tune before doing much more of the setup.


The StroboTuner is spinning away while we tune and set the intonation of the instrument.


What is this?  We have a couple of screws that are having an acetone bath.  Why do you ask?

While we’re working on the guitar, these strap locks are going onto the guitar.


This is the half of the strap lock that goes on the strap.  Both sides are shown.


Those screws that were washed in acetone were painted with black lacquer, and cover up the inserts in the body where the original stop bar was held.  Pretty, isn’t she?

Thanks for reading all the way to the end!

CONTACT – David Latchaw EE
281-636-8626